Nano Cookbook - course materials
Nano Cookbook
This page collects instructions for the May 2023 joint FAO/SeqAfrica workshop “Strengthening Microbial Risk Assessment for Food Safety and Antimicrobial Resistance Using Portable DNA Sequencing Technology”. It’s not a coursebook, rather a collection of recipes and copy-pasteable snippets to turn a plain laptop into a workstation that can process Nanopore runs of (pathogenic) bacterial isolates, all the way to actionable reports.
These instructions were originally intended as the installation and user manual for the FAO-provided laptop and MinION sequencer. As timely delivery became uncertain, the instructions were broken into bite-size bits that could be assembled in various ways.
The order of presentation intermixes installation and usage instructions, which means we sometimes need to hop forward and backward through this guide. Use the road map and table of contents to find your way back when lost.
Road Map
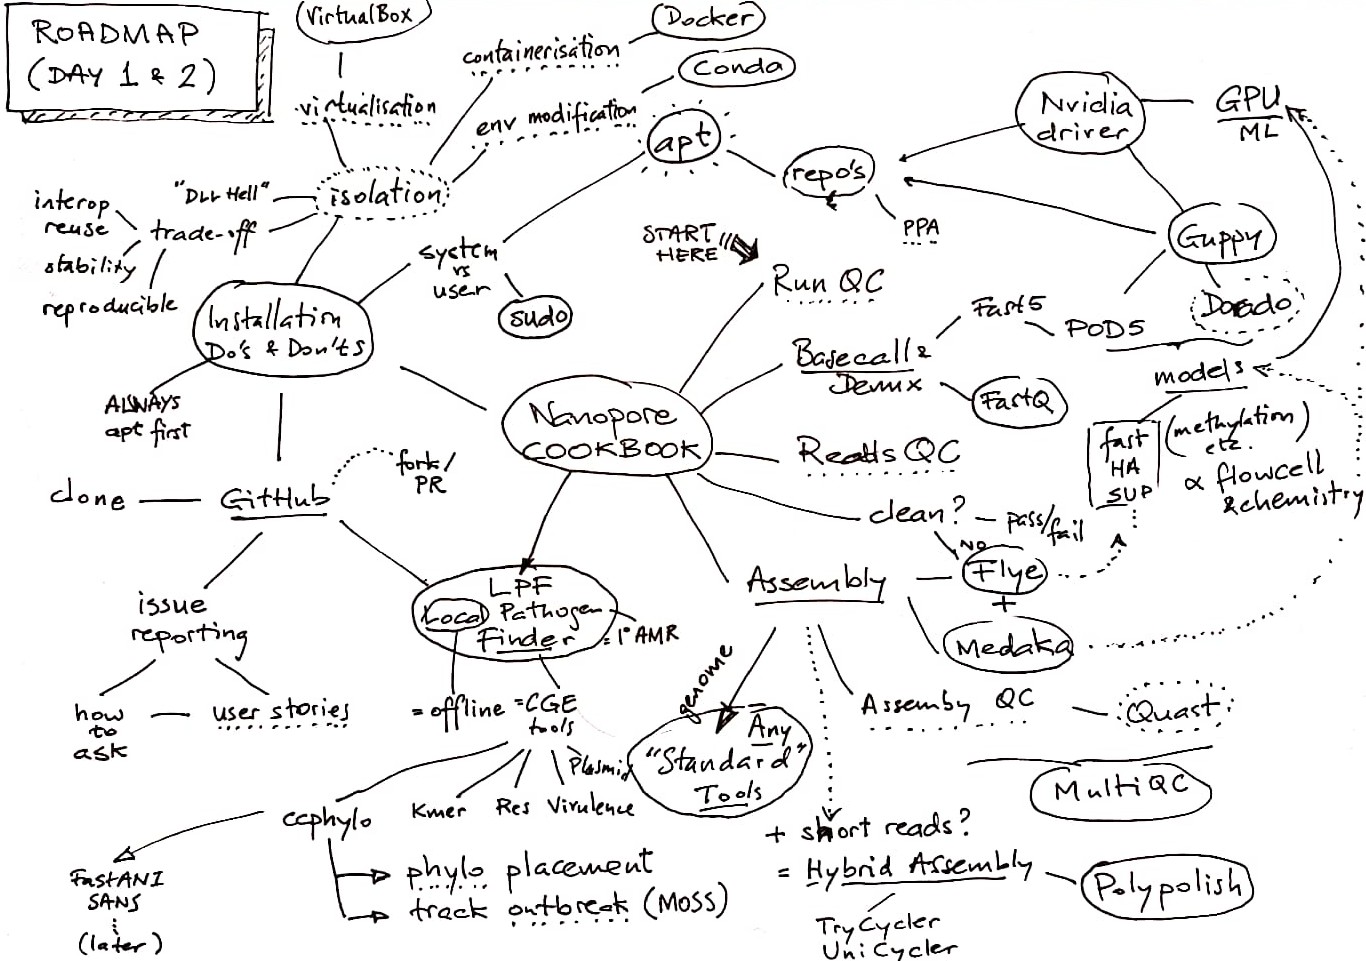
Table of Contents
- Road Map
- Table of Contents
- Prerequisites
- Getting a CLI (recap)
- Sequencing: MinKNOW
- Run QC
- Run to Reads
- Reads QC
- Reads to Genome Assembly
- Assembly QC
- Reads to Analysis Results: LPF
- Installation Do’s and Donts
- Always prefer
sudo apt install - If not in Ubuntu, but available in a Debian/Ubuntu repository
- Otherwise, if precompiled binary available
- Otherwise, if single binary that can be easily compiled
- Otherwise, if the package is “Python installable”
- Containerised in Docker
- Semi-isolated in Conda:
- At all times avoid
- Always prefer
Prerequisites
Knowledge
The instructions here assume basic familiarity with the Linux shell, a.k.a. the command-line (interface), a.k.a. the CLI, as was covered in last year’s training.
To jog your recollection, check that modules 1.1 through 1.3 in the CLI course overview hold few surprises, and check that the concepts from module 2 look reasonably familiar. We will be seeing a lot of those here.
To learn more about the CLI, remember:
man COMMANDandCOMMAND --helpget you a long way- GIYF, and AskUbuntu has many answers and helpful people (be sure to read how to ask questions first).
- A very complete on-line CLI course is LinuxCommand.org
- If you spend a lot of time in the CLI, study the Art of the Command Line.
Computer
The instructions here were intended for a plain Ubuntu Desktop laptop (to be installed by you over the course of the workshop). Lacking that, we propose you use either use an Ubuntu 22.04 Virtual Machine (see VirtualBox below), or a shell into an Ubuntu 22.04 Docker container (see Ubuntu Docker below).
Getting a CLI (recap)
Local: Gnome Terminal
Opening a Terminal
- Click the Ubuntu “Apps” button and start typing “terminal”
- Once it shows, right click and “Add to Favourites”
- From now on, the terminal icon is in the Ubuntu dock
Multiple terminals
- Inside Gnome Terminal, press
Ctrl+Tand a second tab opens - Switch between tabbed terminals: press
Ctrl+PgUp/PgDn
Remote: SSH
Opening a shell into a remote host:
ssh [user@]host
Automating your SSH login: key pairs
- Generate a key pair (if you don’t already have one):
ssh-keygen -t ed25519(pick a secure password and make sure to remember it!) - Copy the public key to the remote host:
ssh-copy-id [user@]host(and type the remote password, not the private password you just set on your key) - From now on
ssh [user@]host(on your machine) will use the key pair - Same key pair can safely be used with all your remote hosts (your own “SSO”: one password for all hosts - which Ubuntu Desktop helpfully caches!)
- Also needed when you set up a GitHub (GitLab, Bitbucket, etc) account
Multiple remote shells: screen
Either open another Gnome Terminal and ssh in from that, or inside the SSH session use screen.
The screen (or tmux) utility ‘multiplexes’ multiple shells in a single terminal session.
- Tip start
screenwhenever you login overssh - To start: inside any terminal, type
screen - Create a new terminal:
Ctrl+A, thenC - Switching terminals:
Ctrl+AthenA - More than two terminals:
Ctrl+Athen1,2, etc., orCtrl+Athen=for a list - Exit the
sshsession but keep screen session running:Ctrl+AthenDD. - Reconnecting to that session:
sshin, thenscreen -DRRU(seeman screenfor meaning)
Sequencing: MinKNOW
General Tips on ONT software:
- New releases (and bugs, and changes!) are announced through the ONT Community Site
- Make sure you have a login there (linked to your institute’s account with ONT) and check in regularly
- Tip: the Updates link in the left sidebar shows the latest release news
- ONT have an Ubuntu repository, which makes installing & updating easy, but it’s … a work in progress and not without glitches
Adding the ONT repositories
Add the ONT repository to the APT sources
# Note this says 'focal' (= 20.04) but it actually supports 'jammy' (22.04)
echo 'deb http://cdn.oxfordnanoportal.com/apt focal-stable non-free' | sudo tee /etc/apt/sources.list.d/ont-repo.list
Add ONT’s GPG package signing key to APT’s trusted keys:
wget -O - https://mirror.oxfordnanoportal.com/apt/ont-repo.pub | sudo tee /etc/apt/trusted.gpg.d/ont-repo.asc
Update APT’s cache of available software:
sudo apt update
Installing MinKNOW
MinKNOW is the GUI tool to set up and perform MinION sequencing runs. Installing MinKNOW pulls in the Guppy basecaller (see below) and other software as well.
The package to install, once you have added the ONT repositories, is (as of last week):
# On machines WITH an NVidia GPU (see the Guppy documentation below)
sudo apt install ont-standalone-minknow-release-gpu

# On machines without an NVidia GPU
sudo apt install ont-standalone-minknow-release
The installation of MinKNOW also installs and enables the Guppy basecall server (guppyd).
If guppyd fails to start, it keeps retrying every 10s and will rapidly fill /var/log/guppy with log files.
This issue has been reported to ONT.
Unless you want to basecall during the sequencing run (likely not, see discussion on models below), better stop and disable guppyd:
sudo systemctl stop guppyd
sudo systemctl disable guppyd
IMPORTANT you must repeat this after every MinKNOW upgrade, as upgrades re-enable the guppyd service.
This will hopefully also be fixed by ONT, as it goes against standard Ubuntu practice (don’t enable things
the user has turned off).
Run QC
MinKNOW stores its run output under /var/lib/minknow/data.
During the run, MinKNOW shows plenty of information on the progress of the run. It copies the
important data and graphs to report_{RUN_ID}.pdf in the run output directory.
This PDF gives the primary Run QC, and is well worth examining before further steps. The
final_summary_{RUN_ID}.txt has a convenient text format summary of the run parameters and outputs.
The run output directory has various other (very detailed) diagnostic outputs.
Run to Reads
MinKNOW produces fast5 files that record the electromagnetic “squiggles” of the nucleotides going through the pores.
The fast5 format will be replaced by the pod5 format (already default in latest MinKNOW).
Installing Guppy
If you installed MinKNOW as above, then Guppy has also been installed. To install Guppy ‘standalone’, i.e. on a system without MinKNOW:
sudo apt install ont-guppy
Guppy requires an NVidia GPU (there is ont-guppy-cpu for systems without GPU, but this
is very slow, and not feasible for HA or higher models).
To install the NVidia driver, generally this works:
sudo nvidia-detector   # This lists the required driver version: XYZ
sudo apt install nvidia-headless-XYZ
Basecalling with Guppy
Basecalling translates fast5/pod5 files to the “universal” fastq format, and is done with guppy_basecaller.
This is the basic invocation:
guppy_basecaller --disable_pings -x auto \
    -c "$GUPPY_CONFIG" \
    -i "$IN_DIR" --recursive \
    -s "$OUT_DIR"
Here, --disable_pings disables telemetry (so Guppy can be run without internet connection),
-x auto automatically selects a GPU, $IN_DIR and $OUT_DIR point at the fast5 input
and fastq output directories respectively, and --recursive means it should search for fast5
files down all subdirectories of IN_DIR.
TODO what is the command when the input is not fast5 but pod5 format?
$GUPPY_CONFIG is the name of a configuration file (relative to /opt/ont/guppy/data) that
matches the sequencing chemistry and flowcell, sequencer model (MinION, Mk1C, PromethION),
and desired basecalling model.
This command lists the available configurations:
guppy_basecaller --print_workflows # time to go grab a coffee
Basecalling models have been trained (as in: Machine Learning) to attain different levels of accuracy:
fastfor basecalling during the sequencing run only, close to real-time but reduced accuracyhac(High ACcuracy) on your laptop, use this for most purposessup(SUPer-high accuracy), highest accuracy, at the cost of very long runtime
Additionally, there are model variants that take into account methylation (modified bases).
Guppy basecaller has many more options. You may want to use --do_read_splitting to
make it detect barcodes in the middle of reads.
guppy_basecaller --help briefly summarizes all options, but you’ll need to visit the
Guppy Protocol
(behind login on the Nanopore Community Site) to read up on details.
Basecalling with Dorado
Dorado is the intended better and faster successor to Guppy. It is available, but not yet stable. Its development is public on GitHub.
Demultiplexing
The fastq files from guppy_basecaller contain all reads, irrespective of barcode. The
next step then is to demultiplex. This is done by guppy_barcoder:
# Demux using all processors (nproc) and the GPU
guppy_barcoder -t $(nproc) --disable_pings -x auto \
    --barcode_kits "$BC_KITS" --enable_trim_barcodes \
    -i "$IN_DIR" --recursive \
    -s "$OUT_DIR"
Most options match those described for guppy_basecaller above. Option $BC_KITS needs
a comma-separated list of the barcode kit(s) that were used. The run report and final summary
(see Run QC) will tell you these.
Hot from the press: the latest
guppy_barcoder(released last week) can take a sample sheet that lists the barcodes that were actually used in the run. @TODO@: which option?
TIP read up on latest Guppy features in the Updates section on the Nanopore Community Site, and in the aforementioned “Guppy Protocol” document.
Joining FastQ
Guppy barcoder writes demultiplexed reads to multiple FASTQ files per barcode, each having (normally) 4000 reads. You’ll want to join these together into a single file per barcode.
Here is the typical Linux “pipes and filters” way to do this:
# In a directory with a bunch of fastq.gz files, modify to your situation
gunzip -c *.fastq.gz | gzip -c >joined.fastq.gz
You can also use the “Merge FASTQ” function in the LPF (see below) to do this in a GUI.
Reads QC
We are now at the stage where we have one reads file per sample, and ready to do QC on those.
Metrics
The go-to tool for reads QC is still FastQC, even if it shows its age (and crashes on large
numbers of long reads). I’ll be happy to replace it by a better alternative, suggestions are
welcome.
Installing FastQC
sudo apt install fastqc
I have not checked, but conceivably MultiQC does reads metrics now? At any rate, highly recommended to bring together QC outputs from multiple tools into a single report:
sudo apt install multiqc
Running FastQC and MultiQC is well documented in their man pages.
Contamination
Multiple ways in which a sequenced isolate can be contaminated:
- Foreign organism (e.g. host DNA, mixed culture)
- Same organism (cross-sample contamination)
- Lab vectors (barcodes, adapters, etc.; see the NCBI UniVec database)
@TODO@ include a tool for doing contamination analysis on reads, and/or rely on contamination detection in assemblies. HPC tools (CheckM, FastQScreen) are too heavyweight. It should be possible to create a rapid (KMA-based) screening application. Addition for LPF?
Reads to Genome Assembly
Not strictly necessary for diagnostics, as reads contain more information than assemblies.
But once assembled (from good quality and deep coverage reads), a Nanopore assembly can be analysed just like any short read assembly.
Flye
Nanopore assemblers are still in development, but Flye is a de facto standard. Installation:
# Note: not on 22.04 yet, works from 23.04
sudo apt install flye
Running Flye is very simple, and according to its documentation needs no prior cleaning or trimming of the reads:
# Using all CPUs on the machine (nproc)
flye -t $(nproc) --out-dir $OUT_DIR --nano-raw $INPUT_FQ
If the reads were corrected, use --nano-corr instead of --nano-raw:
flye -t $(nproc) --out-dir $OUT_DIR --nano-corr $INPUT_FQ
When basecalling was done with the Guppy SUP model and/or read quality is Q20+:
flye -t $(nproc) --out-dir $OUT_DIR --nano-hq $INPUT_FQ
Medaka
Medaka is an assembly polisher and variant caller made by ONT. It is the recommended polisher for Flye assemblies. The Medaka documentation mentions that is has specifically been trained on Flye output (it is an ML-based tool).
Installation ideally from BioConda:
mamba create -n medaka -c conda-forge -c bioconda medaka
If this does not work, or the version you obtain is out of date, building from source in a Conda environment (see the Chapter on “Installation Do’s and Donts” below) is your best option.
To run medaka (using all CPU’s):
conda activate medaka
medaka_consensus -i INPUT_FQ -d ASSEMBLY_FA -o OUTDIR -m MEDAKA_MODEL -t $(nproc)
Where MEDAKA_MODEL should be chosen as closely as possible to the model used for guppy_basecaller.
medaka tools list_models lists the available models.
If Medaka runs out of memory, add option -b 80 to the command-line. If it still runs out of
memory, reduce the 80 further until it doesn’t.
The Medaka docs mention that”for users with RTX series GPUs it may be required to additionally set:
# Execute this AFTER conda activate medaka
export TF_FORCE_GPU_ALLOW_GROWTH=true
Medaka also has a CPU version, which should work in all cases but is much slower.
Hybrid Assembly: Polypolish
If you have short reads in addition to Nanopore reads (from which Flye + Medaka produced a nice
complete genome), then polypolish is the perfect way to ‘polish’ the genome with (high accuracy)
short reads.
Installation of polypolish: download the pre-compiled binary and insert_filter script from
its GitHub site and drop these in your ~/bin.
Polypolish is run on a pair of SAM files that have the mappings of the reads on the genome.
The mapping can be produced with bwa (apt installable). The full workflow then is:
bwa index $DRAFT_FNA && \
bwa mem -t $(nproc) -a $DRAFT_FNA $READS1_FQ > $ALN1_SAM && \
bwa mem -t $(nproc) -a $DRAFT_FNA $READS2_FQ > $ALN2_SAM && \
polypolish_insert_filter.py --in1 $ALN1_SAM --in2 $ALN2_SAM --out1 $FLT1_SAM --out2 $FLT2_SAM && \
polypolish $DRAFT_FNA $FLT1_SAM $FLT2_SAM \
> $OUTPUT_FNA
Assembly QC
Quast is the standard tool here. @TODO@ add installation and invocation.
Once FastQC and Quast have both run, use MultiQC to integrate their output into one HTML report.
Reads to Analysis Results: LPF
This is the tool we were/are going to install on the FAO/SeqAfrica laptops together, but clearly this hinged on the laptop actually being there. :-)
Installation is straightforward, following the instructions linked from the GitHub page, found here.
However, the size of the reference databases is such that a guided walkthrough (with a few special steps) would have been ideal.
We will go through at a demo, and look at what the best approach is to do the installation later.
Installation Do’s and Donts
This section tried to give a prioritised overview of the “do’s and don’ts” of installing bioinformatics (or other) software on an Ubuntu system.
Always prefer sudo apt install
- Try the command you need in the command-line, Ubuntu will suggest the package
- Or use
apt search ... - Then just
sudo apt installthe package - Deinstallation is
sudo apt remove ...(orpurge)
If not in Ubuntu, but available in a Debian/Ubuntu repository
- Examples: ONT software, R CRAN packages:
- Check that their target release is (close to) your current Ubuntu Release (22.04 =
jammy) - Add the repository URL in
/etc/apt/sources.list.d/... sudo apt updatesudo apt installas above- Be aware that their software may conflict with Ubuntu software, miss dependencies, etc
Otherwise, if precompiled binary available
- Example:
polypolish - Download and drop in your
~/bin - Or drop (as root) in
/usr/local/bin - But note that both override
/usr/bin(i.e. a possible laterapt install) - Use
which ...orcommand -v ...to find out which would be called - Deinstallation is
rm ~/bin/...
Otherwise, if single binary that can be easily compiled
- Examples:
kma,flye,fastq-utils: - Git clone its repository:
git clone ... cd kma && make- Then either symlink the resulting binary from
~/bin, or continue as for precompiled binary
Otherwise, if the package is “Python installable”
- I.e. with
pip,pypi,python setup.py,easy_install, etc - If it has an
environment.yaml(e.g.pangolin), use that to do everything - Else always install in a Conda environment of its own
- Setup Conda (see below)
- Create new environment with requirements pre-installed:
conda create -n MYENV PKG1 PKG2 ... - Requirements usually listed in the
README, inrequirements.txtorsetup.py
- Then
conda activate MYEMV - Only then
python setup.py install(orpip install, etc)
Containerised in Docker
- If a prebuilt Docker image is available:
docker pull ... - If a Dockerfile is available:
docker build ... -
Avoid running Docker containers as
root(when they produce output on your filesystem):docker run --rm -u $(id -u):$(id -g) IMAGE [ARGS] -
Running an Ubuntu shell in a Docker container
 docker pull ubuntu:22.04
 docker run -ti --rm ubuntu:22.04 bash -l   # you will be root (but locked inside)
Semi-isolated in Conda:
- Install
miniconda(oranaconda) according to their instructions - Install
mambain the Condabaseenvironment, according to their instructions - Use
mambawhenever you would useconda(much faster) -
Disable auto-activation of the Conda base environment
echo 'auto_activate_base: false' >> ~/.condarc -
Never install things in Conda
base, always in newly created environmentsmamba create -n MYENV [PACKAGES TO INSTALL] mamba activate ENVNAME -
Installing additional Python packages in an existing Conda env
 mamba activate ENVNAME
 mamba install ...
 or: pip, pypi, setup.py, easy_install etc
At all times avoid
- Don’t
sudo make install - Don’t even more:
curl https://get-something.org | sudo sh -